Information for libraries
Steps
It is recommended that the library contacts their IT department before beginning the process of acquiring this equipment.
1) Library needs to make contact with the Core Team via Support – NHS Knowledge & Library Hub Service Desk to highlight intention to purchase a self-service kiosk.
Library needs to provide details of:
– Supplier
– Equipment requiring a SIP2 connection (kiosk, gates, pad etc)
– Likely timescale or expected installation date (note: before agreeing installation date the Core Team need to check that Graham Troth from Axiell is available to be on standby for any technical troubleshooting)
– Named library contact who is managing self-service project (contact details to be supplied)
2) The Core Team will log a call with Infor to ask for a temporary support portal login to be created so that library staff can liaise directly with Axiell regarding the installation. The Core Team will include the information above that has been provided by the library.
3) Axiell then create an quote/order form that will be sent to NHSE to cover the cost of setting up the connection between the equipment and the LMS.
4) Axiell create the required port IDs. They also send the library contact the Stunnel software to download via the Axiell support portal. Please note that it isn’t possible to send software via email, it has to be done via the Axiell support portal. Please ensure that the library staff contact has the necessary permissions from the local IT department to download this software from the Infor support portal.
5) The library contact will receive an email from the support portal to notify them when Stunnel is available to download.
6) The library contact needs to contact their IT department to ask for port 1424 (incoming and outgoing) between the SIP2 kiosk and swimsstaff.inforlib.uk to be opened. This port needs to be opened before installation and needs to remain open.
7) For instructions on how to install Stunnel see the section below. Library services may be able to install this onto their kiosks themselves or may need to ask for help from IT depending on whether they have admin level access. For new installations the company may install as part of set up or access remotely to complete the configuration. Any technical queries about the installation should be raised through the Infor support portal.
8) After install and configuration test transactions must be run and checked on V-smart to ensure that they appear correctly. For these test transactions you will need to record and check: borrower barcode, book/item barcode, title, transaction type and time stamp. It is also worthwhile testing using accounts registered to different staff groups (e.g. staff, students) to ensure any variation in borrower settings is being picked up correctly by the self-service transactions. You can create temporary dummy accounts can be created for testing purposes. Suggested test transactions can be found here
The ones relevant to us are loan and return of different material types, borrowers with circulation notes, return of items, loan of an item that is already on loan, renewal of an item, borrower with automatic block and borrowers with replacement barcodes.
Installation of Stunnel (32 bit) on a kiosk
Stunnel is software that needs to be added to your kiosk(s) to enable it to communicate securely with the LMS.
- Request that your IT Department open port 1424 (incoming and outgoing) between the SIP2 server and swimsstaff.inforlib.uk
A suggested blurb to provide to your IT Department:
“We are part of a network of NHS libraries across the South of England. We use a library management system, purchased by Health Education England. We have purchased a self-service kiosk in order to improve our borrower’s experience and need to test that our machine will connect to the required software ready for implementation. To this end, please could you open port 1424 (incoming and outgoing) between our SIP2 server and swimsstaff.inforlib.uk”
- Contact your self-service machine supplier and ask them for instructions on how to access the SIP2 configuration file on your self-service machine if you are unaware of how to do this. You need to change the relevant SIP details (which will be similar to the below but may vary depending on supplier):
- Login location: SWIMS/TOR (replace TOR with your local library code)
- Server ip address: localhost or 127.0.0.1
- Server port: 19740
- SIP server login name: TORSC1 (replace TOR with your local library code)
- SIP server login password: SIP2TORSC1 (replace TOR with your local library code)
- Tick the ‘Use ACS login’ box (for 2CQR machines)
Your supplier may be able to remote in and update these details on your behalf, or alternatively provide instructions on how to do this yourself.
On our 2CQR machine, because we accessed the software directly on the self-service machine, we had to restart the computer in order for these instructions to work. If you are accessing the software remotely from a linked library PC, there may be an option to “restart” from within the software which doesn’t entail turning the kiosk off and on again.
- Next you need to download the Stunnel software onto your self-service machine. The Stunnel software is available to download from the Axiell support portal (you will have been given logons for this).
Depending on your setup, you may need your IT Department or supplier to download the software as an administrator. We did not need to enter an administrator password on our 2CQR machine – I was able to download it myself. I would recommend trying it yourself, and if this does not work, getting your IT Department or self-service supplier involved. Be warned – our IT Department will not support or help us with our self-service machine as it isn’t a Trust machine.
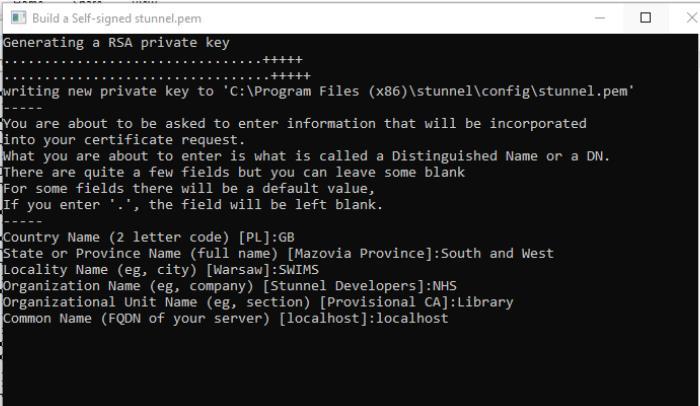
- The Stunnel software will open a separate Command window where it will create a self-signed SSL certificate that it needs to create a secure connection. Please enter the following when prompted:
- Country name: GB
- State or Province name: South
- Locality: SWIMS
- Organization name: HEE
- Organizational unit name: Library
- Common name (FQDN): localhost

- 5. Tick the ‘start Stunnel after installation’ check box in the original installation window, then click Finish.
6.Replace the existing stunnel.conf file in the same config directory (e.g. C:\Program Files\Stunnel\config) with the new version available from the Infor support portal.
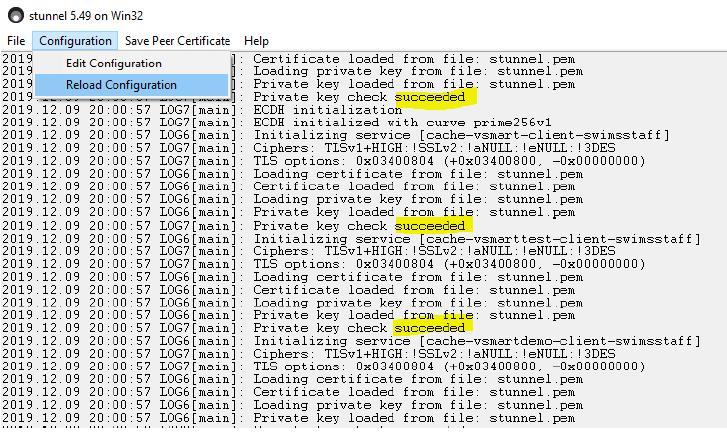
7. Open the Stunnel admin tool from the self-service machine’s desktop. Select the configuration menu and select the Reload Configuration option (see image below). Restart the self-service machine for the changes to take effect (or stop and restart the software if accessing this remotely).
- This should now have linked the self-service machine to Infor’s server – you need to check that the above screen shows each element has succeeded (as highlighted above).
- Go to the Windows Start menu on the bottom-left of your screen, select All Programs, then stunnel AllUsers:

From this menu:
a) Select the stunnel GUI stop option
b) Select stunnel Service Install – click ok to confirm that the service has been installed
c) Select stunnel Service Start – click ok to confirm that the service has started
The SIP2 connection should now be working and the self-service machine will be linking directly to the Axiell Test database. Restart the self-service machine and your normal self-service software should show on screen.
- Run some test transactions in live and offline mode (see separate instructions). You can check how this alters the data in the test database.
Other information
It is necessary for the port to remain open for the kiosk to be able to continue to transmit data real-time to the LMS.
Some peripheral equipment (security gates, tag pads etc.) shares a V-Smart PortId with the kiosk. In other cases separate PortIds may be required, depending on the equipment.
It should be noted that SIP2 parameters can vary.
It is possible for Axiell to check connectivity by analyzing the logs at their end and by running reports in SSP. For more detailed support you may be required to obtain a copy of the SIP2 log from the kiosk. You may need to ask the hardware provider to do this for you if you do not have access. The SIP2 log from the kiosk will need to be uploaded to a support portal incident.
Testing should be carried out after connecting to the live system using dummy user records if desired.
It is possible when testing a kiosk to connect it wirelessly to the LMS if the kiosk has a wireless card. This can be helpful if you are experiencing connectivity issues as it helps to diagnose whether the issue is network related (if you are able to wirelessly connect temporarily to another network).
